Quality assurance is a critical component in developing a successful video game. Because interactive games can have complicated scenarios, manually testing video games can become time-consuming and challenging. Challenges like this one have inspired GameDriver to bring automated testing capabilities to video game testing. They have done so by building a reusable framework that gives testers the ability to automate repetitive types of tests, catch defects early, streamline the development pipeline, and let the developer find and fix any objects while debugging.
In this guide, I’ll take you through the steps for setting up a basic CI/CD Pipeline with GameDriver. By following them, you can reduce the time required to integrate changes for a release and thoroughly test each change before moving it into production.
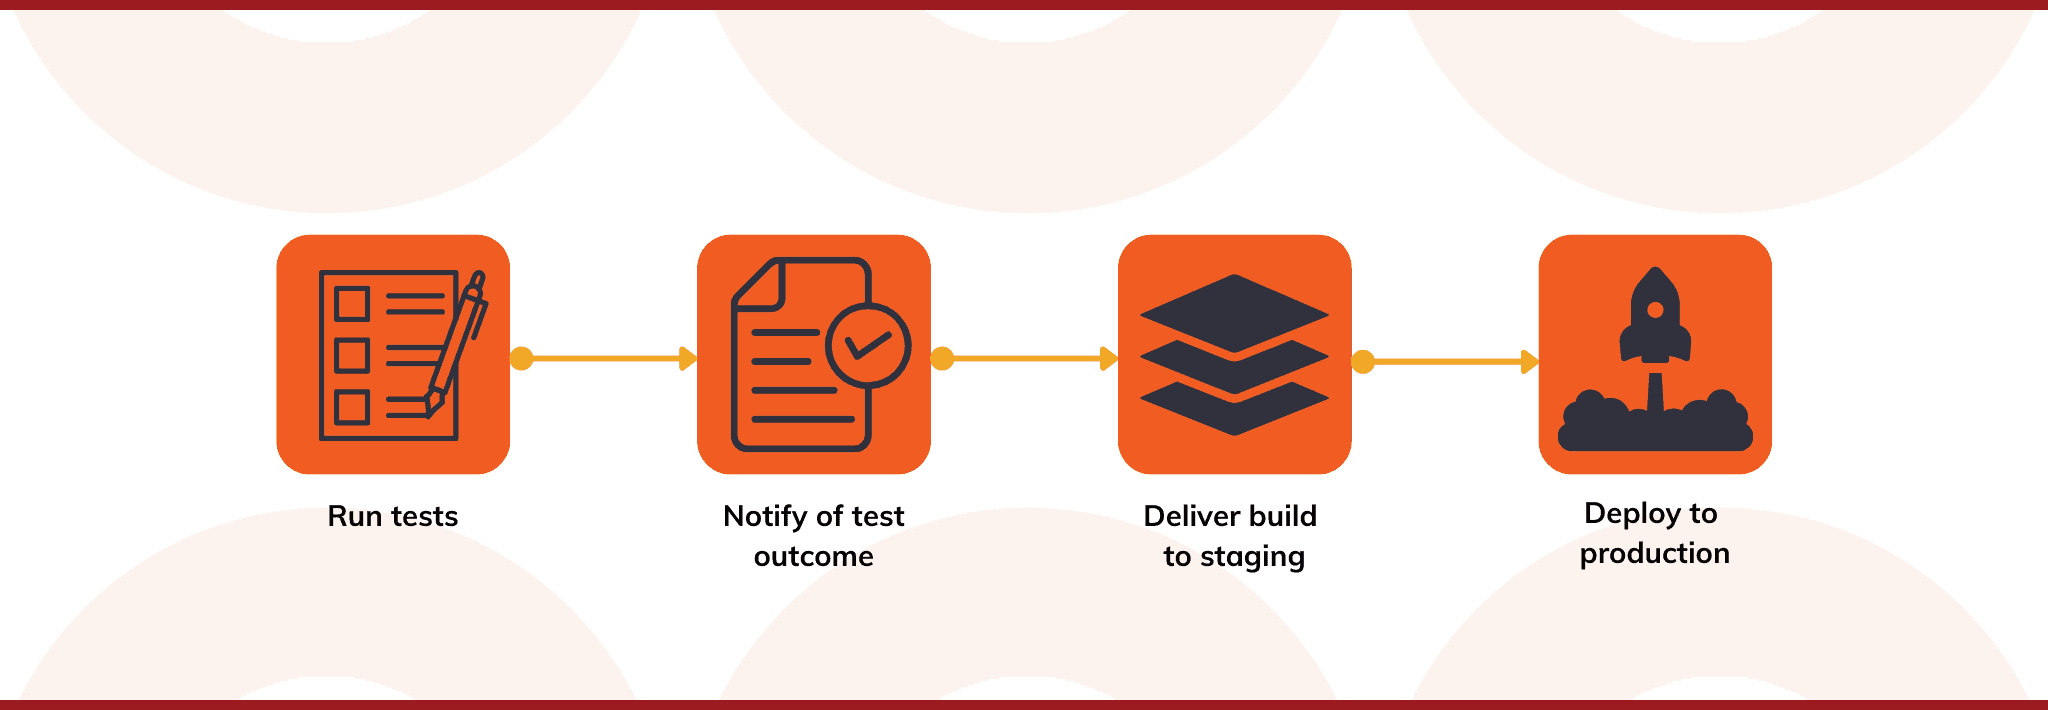
How To Set Up A Basic CI/CD Pipeline With GameDriver
So, maybe you’ve got some basic tests built and running with GameDriver (perhaps the ones described here) and you’re looking for a possible next step. Alternatively, you may be wondering if you can run GameDriver tests as part of an existing CI/CD pipeline, or maybe you’re just looking to move the build process off your development machine. This guide will look at one way to set up a simple CI/CD process using GitHub and Jenkins, building the 2D Game Kit and running the GameDriver tests on a spare Windows 10 machine.
A couple of things to keep in mind as you read through the guide: any keywords in <> are places where you’ll need to insert your own information e.g. <username> would be a username that you created; phrases in italics are usually paths or menu selections; phrases in Courier New font are either code or console commands. I am assuming that you’re working on a network of some sort; I also have file name extensions enabled in Windows folders.
Step 1. Sign up for GitHub
This is a pretty easy first step – if you don’t already have an account, you can sign up at GitHub.
Step 2. Add GitHub for Unity to your Unity project and push your project to GitHub
You’ll need to add the GitHub asset to the projects that you want to add to source control and – the easiest way to do that is through the Asset Store, accessed from the Unity Editor. Simply search for GitHub and add it to your project (like you did with the 2D Game Kit, or any other assets you used). Once the import is done, you’ll have a “plugins” folder in your project assets with GitHub for Unity. GitHub has a quick start guide to cover what you need to do to get started.
A few points to keep in mind as you work through the quick start guide:
- You must set up a gitconfig file before you initialize your project:
- In Windows 10, I navigated to C:\Users\<user>\AppData\Local\GitHubUnity\git
- I ran git-cmd.exe in that folder and executed the following commands:
-
git config user.name "<GitHubUsername>" -
git config user.email <GitHubUserEmail>
-
- This should create a gitconfig file in C:\Users\<user> which you can review with a text editor like Notepad++
- When creating the empty repository, I selected a private one
- After the initialization step, you’ll need to sign into your GitHub account – I used the Sign In with Browser option.
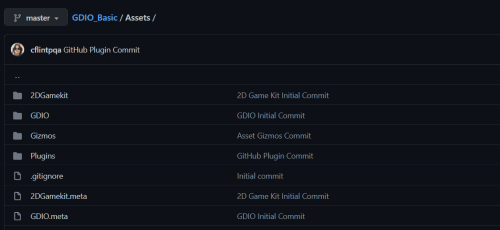
- After you’ve done the initial commit and push with a new, empty repository, you’ll need to commit your project files. If you’re continuing from the 2D Game Kit tutorial, commit and push the following folders (and associated meta files):
- 2DGamekit asset folder
- GDIO asset folder
- Gizmos asset folder
- Packages folder
- Plugins folder with the GitHub assets (I believe this will be useful when cloning the repository on another development machine, should it be needed)
- ProjectSettings folder
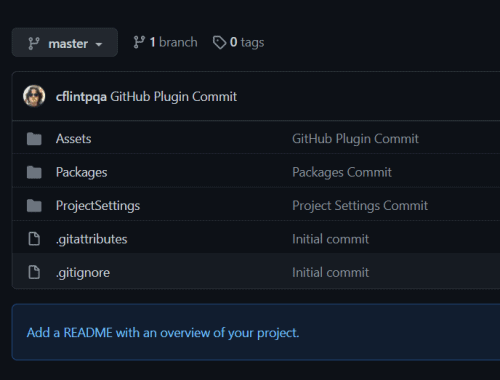
- Check your repository on GitHub – your Unity project files should be present
Step 3. Push your test solution to GitHub and adjust your code to work on the build machine
You’ll also need to add your test solution to source control; if you’re using Visual Studio 2019 (which I am), the default source control option is conveniently Git. Select View > Git Changes to open the Git Changes pane.
- Click the “Create Git Repository” button
- Select GitHub under “Push to a new remote” (if it’s not already selected)
- In the Account dropdown, add your GitHub account
- Set a Repository Name and enter a Description (optional)
- Check the Private checkbox (if you want your test code to remain private)
- Click the “Create and Push” button
- You may get prompted to save changes to your code or solution
VS will commit and push your test code to your new repository, check it out on GitHub.
Now, if we were to take the code to the build machine exactly as written, we’d potentially run into two problems, especially if you’ve been working through the 2D Game Kit Automation tutorial:
- The launch command in your tests is either hooking into the Unity Editor or launching a standalone player on your local machine (instead of your build machine) so you’ll need to point the launch command at the right location on the build machine
- You will have a reference to the GDIO Unity API in your test solution that points to a folder on your local machine, which must be updated on the build machine so that the tests will actually work.
My Unity project for the 2D Game Kit built the player in a “Builds” folder under the standard project folder – Jenkins runs jobs in workspace folders named after the associated job. When we eventually run the Unity build on the Jenkins machine we can refer to paths that are relative to the workspace folder, knowing that our Unity project settings should create a “Builds” folder automatically. To solve the first problem, I added a new launch command similar to the following:
connected = Api.Launch(@”.\Builds\GDIO_Pipeline.exe”);
As an aside, you should probably have your launch command in a code block that checks which machine it’s running on, but I’ve just opted to comment out individual lines of code for the purposes of the guide.
In order to solve the second problem, we need to update our GDIO reference in the test solution; luckily the Unity build process will also place the GDIO Unity API files in the “Builds” folder. The easiest thing that I found was to add the (relative) path to the AssemblySearchPaths property used when the test solution gets built. You will need to edit the .csproj file for your test project directly (either in VS or a text editor), and add the following xml block (I placed it just before the closing project tag in my .csproj file):
<Target Name="BeforeResolveReferences">
   <CreateProperty
Value="..\..\Builds\GDIO_Pipeline_Data\Managed;$(AssemblySearchPaths)">
      <Output TaskParameter="Value"
   PropertyName="AssemblySearchPaths" />
   </CreateProperty>
</Target>
I have left the locations hard-coded for this guide (GDIO_Pipeline is the name of my Jenkins Pipeline job) but this likely could (and probably should) be parameterized in some fashion.
Be sure to commit and push your changes to GitHub!
Step 4. Set up your build machine
As mentioned in the introduction, I used a spare Windows 10 laptop to host Jenkins and run the build process, so the following details are going to be Windows-specific. That said, it should be possible to do all of these things on other systems/operating systems with a bit of research.
You’re going to need to install a number of programs., and I added their directories to the Path under the system variables (I wanted the option of running individual programs from the command line, as needed). So, you’ll need:
- Java – I’ve used version 8, found here.
- Git – latest install
- NuGet (Command Line) – installed from here (recommended latest as of this writing is v5.8.1)
- NUnit Console – (3.12.0 as of this writing)
- Unity Hub and Editor (if you’ve been following the 2D Game Kit automation tutorial, this is the same process of installing the Hub, then using the Hub to install the latest LTS version of the Editor, Visual Studio should get installed as part of this process)
- In the Visual Studio folders, there’s an MSBuild.exe that I added to the system path as well (found at C:\Program Files (x86)\Microsoft Visual Studio\2019\Community\MSBuild\Current\Bin on my build machine)
- Jenkins – LTS version
- Some important things to note here – I initially used the Windows installer for Jenkins to install it as a service, but it didn’t interact with the desktop as I expected when it’s a service. I found that it needs to run as a process as described here.
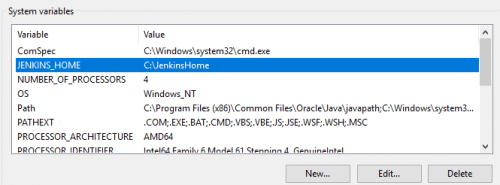
- I also created a Jenkins “home” folder to hold the workspaces at C:\JenkinsHome and added that folder to the System Variables as JENKINS_HOME
-
- Follow along with the post-installation guide in the installing/war-file link above to get your Jenkins up and running – I just used the “Install suggested plugins” option to start
- I did add one additional plugin (GitHub Integration): go to Manage Jenkins > Manage Plugins > Available tab and search for GitHub. Click the checkbox next to the plugin bar, and click the Install without Restart button.
- I also created a batch command file to restart Jenkins on system startup, for a more graceful pick up in the event of a reboot.
Step 5. Create your first build pipeline
Jenkins has several options for running jobs, such as Freestyle jobs and Pipelines. I decided to use a Pipeline job since I wanted to explore the scripting syntax, but I have no doubt that you could rig up your build process any way you needed.
To create a new Pipeline job:
- On the Jenkins Dashboard, click the New Item link in the left-hand pane
- Enter a name for your job; I used GDIO_Pipeline for my first job
- Select “Pipeline”
- Click the Ok button: Jenkins will create the job framework and take you to a status page for your new pipeline
- In the left-hand pane, click the Configure link
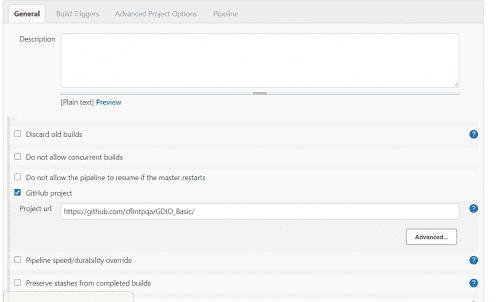
The configuration page is where you’ll define the engine that will run your build process; there are 4 major parts: a General section, a Build Triggers section, an Advanced Project Options section, and a Pipeline section.
In the General section, check the GitHub project checkbox and enter the GitHub URL for your Unity project.
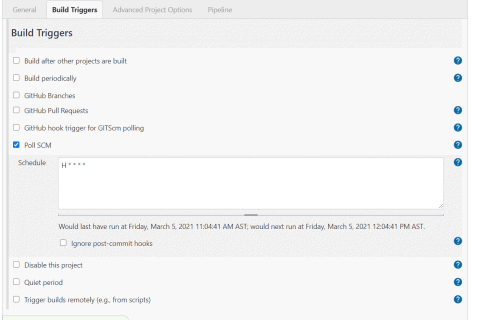
In the Build Triggers section, check the Poll SCM checkbox. For our first pipeline, I decided to keep it simple and have Jenkins poll GitHub every so often for changes. Polling uses a cron job to define how often Jenkins runs its checks, and you have a lot of flexibility in how you set this up. See https://en.wikipedia.org/wiki/Cron for a quick overview of how this works. I’ve used H * * * * in my pipeline to poll GitHub every hour.
The last thing to do is put together your pipeline in the Pipeline section. I used the Declarative Pipeline syntax (as described here). There are a lot of options to use, so I’ll just go over the parts that I used to get my pipeline up and running.
I decided to use a “build-test-deploy” framework for my pipeline, so we’ll start with a pipeline block, which build agents we want to use, and a stages block with our stages and any steps our stages take.
pipeline {
   agent any
   stages {
      stage('Build') {
         steps {
            echo 'Building'
         }
      }
      stage('Test') {
         steps {
            echo 'Testing'
         }
      }
      stage('Deploy') {
         steps {
            echo 'Deploying'
         }
      }
   }
}
If you were to run this pipeline now, it would use the first available agent, since we chose “any”, and step through each stage, writing “Building” (etc) to the console output.
Step 6. Defining the Build Stage
Our next step is to expand our build stage – we need to checkout our Unity project from GitHub, then actually build it. The checkout step in the script can be complex, but luckily there’s a Snippet Generator that we can use to create the code we need.
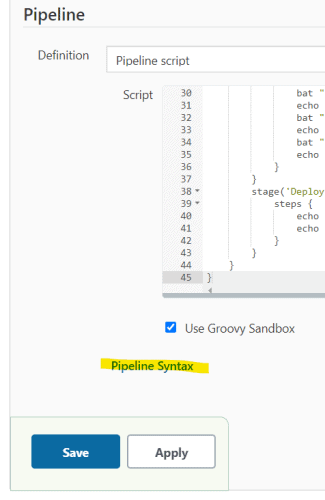
- At the bottom of the pipeline configuration page, there’s a link “Pipeline Syntax”; clicking it should open the Snippet Generator page
- Select a sample step of “checkout: Check out from version control”
- Select “Git” in the SCM (most likely the default option)
- Set the Repository URL to your VS test repo on GitHub (e.g. https://github.com/<username>/<RepoName>)
- Set the credentials:
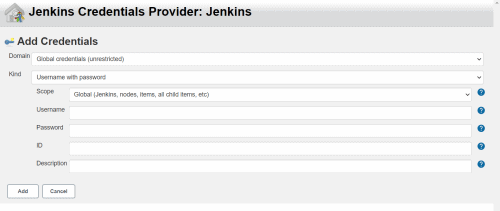
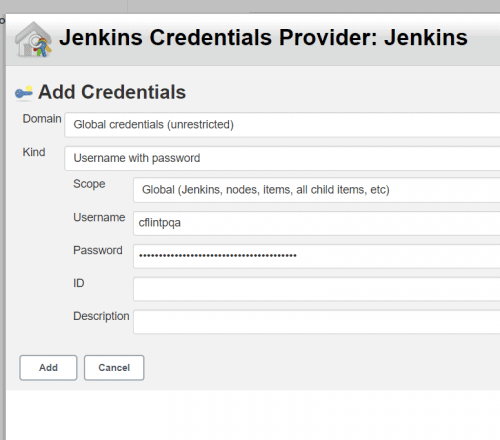
- If you need to add new credentials to access your GitHub repositories, click the Add dropdown, and select “Jenkins” to open the Jenkins Credentials Provider
-
- For the username, I used my GitHub username
- For the password, I used a GitHub Personal Access token
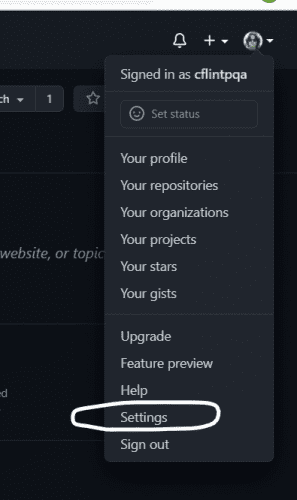
- While logged into GitHub, click your user icon
- Select “Settings” from the dropdown
-
-
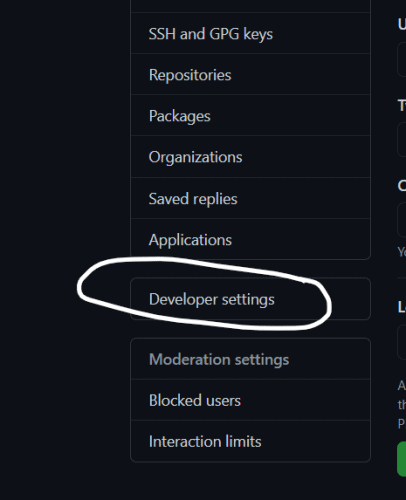
- Select “Developer Settings” in the left hand menu bar
-
-
-
- Select “Personal Access Tokens”
-
-
-
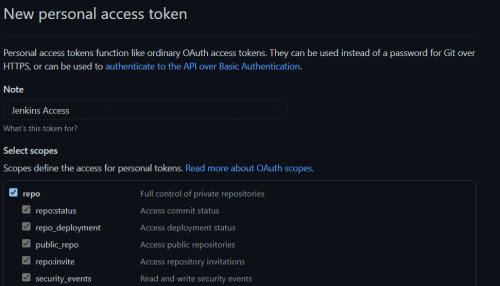
- Click Generate New Token
- You’ll be prompted to enter sudo mode, so you’ll need to re-enter your password here
- Enter a brief note (e.g. Jenkins token)
- Check the repo checkbox
- Click Generate New Token
-
-
-
- Click “Generate token”
-
-
-
- On the next screen, copy the token string and paste it into the password field in the Jenkins Credentials Provider
-
-
- Click the “Add” button to add the credentials
- Your credentials should now appear in the Credentials dropdown list
- Set the branch if you’re building something other than the master branch; I’ve just left it as master for the purposes of the guide
- Click the “Generate Pipeline Script” button and the lower text box should be filled with something like (do note that your credentials Id and url will likely be quite different from the ones shown below)
checkout([$class: 'GitSCM', branches: [[name: '*/master']],
doGenerateSubmoduleConfigurations: false, extensions: [],
submoduleCfg: [], userRemoteConfigs: [[credentialsId:
'4c85ccb5-9c8e-4805-8187-603f000e990c', url:
'https://github.com/cflintpqa/GDIO_Basic']]])
- Copy the snippet and paste it in your Build steps block:
Unity can build projects from the command line, so I’ve set up a bat command step in the build stage to run the Unity build process. Jenkins also provides standard environment variables that we can use in our commands, such as JOB_NAME or WORKSPACE. Going over the specifics of Windows batch commands is somewhat beyond the scope of this guide, but I did set a couple of variables to help simplify the actual build commands; I also wrapped the command in triple single-quotes (”’) since it’s a multi-line batch command:
stage('Build') {
   steps {
      echo 'Building!'
      checkout([$class: 'GitSCM', branches: [[name: '*/master']],
   doGenerateSubmoduleConfigurations: false, extensions: [],
   submoduleCfg: [], userRemoteConfigs: [[credentialsId:
   '4c85ccb5-9c8e-4805-8187-603f000e990c', url:
   'https://github.com/cflintpqa/GDIO_Basic']]])
      bat '''set UnityHubLocation=C:\\Program Files\\Unity\\Hub
      set UnityVersion=2019.4.19f1

      echo Attempting to build %JOB_NAME% in Unity Version
   %UnityVersion%.
      echo Workspace location: '%WORKSPACE%'
      echo Unity Hub location: '%UnityHubLocation%'

      "%UnityHubLocation%\\Editor\\%UnityVersion%\\Editor\\Unity.
   exe" -projectPath="%WORKSPACE%" -quit -nographics -batchmode
   -logFile "%WORKSPACE%\\Logs\\UnityEditor.log"
   -buildWindows64Player "%WORKSPACE%\\Builds\\%JOB_NAME%.exe"

      echo Build finished, see attached log for information!'''
   }
}
When this pipeline runs, Jenkins will connect to your Unity project GitHub via the URL, and build the standalone player in the workspace defined above.
Step 7. Defining the Test Stage
Next, we’re going to define our test stage – I started by retrieving the test code from GitHub. Use the Snippet Generator to build another checkout step, this time pointing at your tests repository.
- Set the Repository URL to your VS test repo on GitHub (e.g. https://github.com/<username>/<testRepoName>)
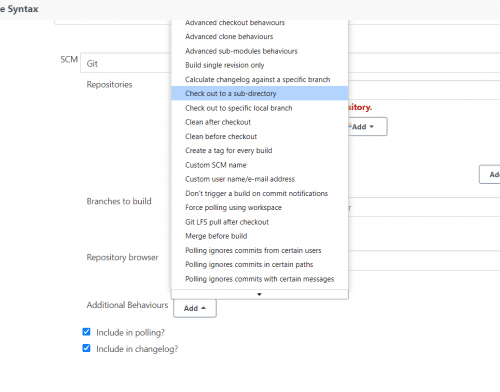
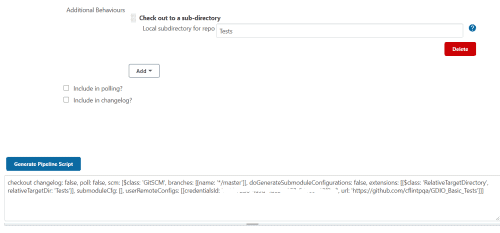
- For Additional Behaviours, select Add>“Check out to a sub-directory” and enter a sub-directory name; I used “Tests”
- Uncheck “Include in polling?” and “Include in changelog?”
This command will create a Tests folder in the Jenkins workspace and copy your VS solution/code to it.
At this point, if we run the build, we should have a built standalone Unity game, and the code for the tests we want to run against it. To actually run the tests, we need to:
- retrieve any missing NuGet packages
- rebuild the solution
- run the NUnit tests
These can all be accomplished with bat commands. I took the time to add some environment variables for the full paths to the various executables, as well as the name of the test solution. Groovy string interpolation then allows us to call the variables with ease. Under the agent any command, add an environment block with your variables and their contents, like so (these paths are where they reside on my Jenkins machine, yours may differ):
environment {
   slnName = "GDIO_Basic.sln"
   nuget = "C:\\Program Files (x86)\\NuGet\\nuget.exe"
   msbuild = "C:\\Program Files (x86)\\Microsoft Visual Studio\\2019\\Community\\MSBuild\\Current\\Bin\\MSBuild.exe"
   nunit = "C:\\Program Files
(x86)\\NUnit.org\\nunit-console\\nunit3-console.exe"
}
Then, in the test steps block, you can add the bat commands needed (I’ve included some echo commands explaining what we’re doing at each step):
stage('Test') {
   steps {
      echo 'Testing'
      checkout changelog: false, poll: false, scm: [$class:
'GitSCM', branches: [[name: '*/master']],
doGenerateSubmoduleConfigurations: false, extensions: [[$class:
'RelativeTargetDirectory', relativeTargetDir: 'Tests']], submoduleCfg:
[], userRemoteConfigs: [[credentialsId:
'4c85ccb5-9c8e-4805-8187-603f000e990c', url:
'https://github.com/cflintpqa/GDIO_Basic_Tests']]]
      echo 'Restore NuGet Packages, if needed'
      bat "\"${nuget}\" restore \"Tests\\${slnName}\""
      echo 'Rebuild Test solution'
      bat "\"${msbuild}\" \"Tests\\${slnName}\""
      echo 'Run the Tests'
      bat "\"${nunit}\" \"Tests\\${slnName}\""
      echo 'Testing finished!'
   }
}
Once you’re done writing out your Pipeline configuration, click the “Save” button. (The entire script that I used can be found below)
Step 8 – Run your first build
On the Pipeline Status page, you can click the “Build Now” option in the left-hand pane to trigger the build immediately. When a build is running, there should be a little flashing “bubble” icon under the Build History – if you click it, it will take you to the build console output and you can watch the build execute. Hopefully all goes well for the first build! If you need to do some troubleshooting, recall that we’re saving the Unity editor logs to <JenkinsWorkSpace>\Logs\UnityEditor.log and the other batch commands should record any issues in the console output in Jenkins.
Ideas for the future
When I set out to write this guide, it was mainly a way to see if I could hook up all the parts to make a CI/CD pipeline with GameDriver tests, so I deliberately kept it as simple as I could. That said, there are several ways that we could expand on this:
- We could pull from multiple repository branches, or you might incorporate your tests into your Unity project directly, for example.
- We could rework our pipeline – perhaps you want to have a test build, run your tests, and only run a deployment build if the tests pass, before finally deploying
- We didn’t really touch on the deployment step in the pipeline that we put together above, but you could package up the builds and put them in a shared location/in the cloud
- We could use a different SCM tool – Unity supports Perforce and PlasticSCM natively
- You may run into bandwidth issues with GitHub if you’re just using a basic personal account like I am at the moment – Unity projects can get pretty big
- We could use a different build tool – while Jenkins is free and open-source, it’s not the only tool out there
In any case, I hope you’ve found this useful, and you’ve managed to avoid the pitfalls I fell into. Happy testing!
Appendix – The full pipeline script I used in my configuration:
pipeline {
    agent any
    environment {
        slnName = "GDIO_Basic.sln"
        nuget = "C:\\Program Files (x86)\\NuGet\\nuget.exe"
        msbuild = "C:\\Program Files (x86)\\Microsoft Visual Studio\\2019\\Community\\MSBuild\\Current\\Bin\\MSBuild.exe"
        nunit = "C:\\Program Files (x86)\\NUnit.org\\nunit-console\\nunit3-console.exe"
    }
    stages {
        stage('Build') {
            steps {
                echo 'Building!'
                checkout([$class: 'GitSCM', branches: [[name: '*/master']], doGenerateSubmoduleConfigurations: false, extensions: [], submoduleCfg: [], userRemoteConfigs: [[credentialsId: '527b72b8-4a9d-4a6b-9053-948b3912f9cd', url: 'https://github.com/cflintpqa/GDIO_Basic']]])
                bat '''set UnityHubLocation=C:\\Program Files\\Unity\\Hub
                set UnityVersion=2019.4.19f1

                echo Attempting to build %JOB_NAME% in Unity Version %UnityVersion%.
                echo Workspace location: '%WORKSPACE%'
                echo Unity Hub location: '%UnityHubLocation%'

                "%UnityHubLocation%\\Editor\\%UnityVersion%\\Editor\\Unity.exe" -projectPath="%WORKSPACE%" -quit -nographics -batchmode -logFile "%WORKSPACE%\\Logs\\UnityEditor.log" -buildWindows64Player "%WORKSPACE%\\Builds\\%JOB_NAME%.exe"

                echo Build finished, see attached log for information!'''
            }
        }
        stage('Test') {
            steps {
                echo 'Testing'
                checkout changelog: false, poll: false, scm: [$class: 'GitSCM', branches: [[name: '*/master']], doGenerateSubmoduleConfigurations: false, extensions: [[$class: 'RelativeTargetDirectory', relativeTargetDir: 'Tests']], submoduleCfg: [], userRemoteConfigs: [[credentialsId: '527b72b8-4a9d-4a6b-9053-948b3912f9cd', url: 'https://github.com/cflintpqa/GDIO_Basic_Tests']]]
                echo 'Restore NuGet Packages, if needed'
                bat "\"${nuget}\" restore \"Tests\\${slnName}\""
                echo 'Rebuild Test solution'
                bat "\"${msbuild}\" \"Tests\\${slnName}\""
                echo 'Run the Tests'
                bat "\"${nunit}\" \"Tests\\${slnName}\""
                echo 'Testing finished!'
            }
        }
        stage('Deploy') {
            steps {
                echo 'Deploying!'
                echo 'Here is where we would copy the files to a deployment location'
            }
        }
    }
}

